To grow bee balm seeds successfully, select varieties that attract bees and butterflies, with colors like red, pink, and purple rich in nectar and pollen. Choose a sunny, well-drained spot with quality soil, adding compost for nutrients and adjusting pH if needed. Water lightly before planting. Start seeds indoors in trays with potting mix and indirect sunlight, transplanting when ready, or directly sow in well-drained soil outdoors. Provide 6-8 hours of sunlight, keep soil slightly moist, fertilize in spring, and deadhead for continuous blooming, avoiding powdery mildew. Harvest seeds when dry for future use.
Hints at more in-depth guidance on growing bee balm seeds are available beyond these initial planting tips.
Key Takeaways
- Choose bee balm seeds for attracting bees and butterflies in various colors.
- Plant in sunny, well-drained soil with compost and proper pH.
- Start seeds indoors or directly sow in garden soil.
- Provide sunlight, moist soil, and fertilize for healthy growth.
- Prune, deadhead, and harvest seeds for continuous blooming.
Selecting the Right Bee Balm Seeds
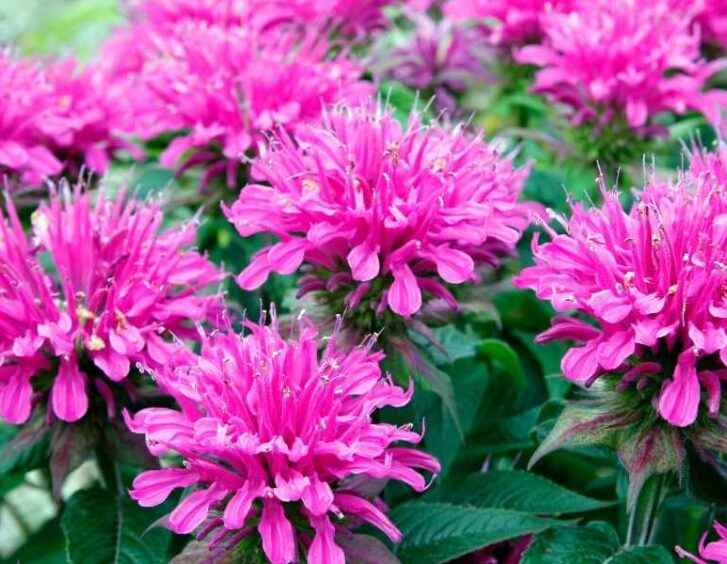
When selecting bee balm seeds for planting, opt for varieties known to attract pollinators like bees and butterflies. These seeds come in different colors, such as red, pink, and purple, adding vibrancy to your garden while providing a welcoming environment for these beneficial insects. Look for bee balm seeds labeled specifically for attracting pollinators, as they're often important in nectar and pollen, making them irresistible to bees and butterflies.
Choosing the right bee balm seeds is important for creating a thriving ecosystem in your garden. By selecting varieties that attract pollinators, you not only contribute to the well-being of these insects but also enhance the beauty of your outdoor space. Imagine colorful butterflies gracefully fluttering around your bee balm plants, their delicate wings adding a touch of magic to your garden.
When you plant bee balm seeds that attract bees and butterflies, you're fostering a sense of belonging for these pollinators in your garden. They'll visit regularly, pollinating your plants and ensuring a bountiful harvest. By consciously selecting bee balm varieties that cater to these insects, you're creating a harmonious environment where all creatures, big and small, play an important role in the cycle of life. So, choose your bee balm seeds wisely and watch as your garden becomes a buzzing hub of activity and beauty.
Preparing the Planting Site
To guarantee successful growth, meticulously prepare the planting site for your bee balm seeds. Choose a location that receives at least 6-8 hours of sunlight daily. Bee balm thrives in well-draining soil, so make sure the area has good drainage to prevent waterlogging, which can harm the seeds. Before planting, loosen the soil with a garden fork or tiller to a depth of about 6 inches. This will help the roots penetrate easily and allow for better nutrient absorption.
Remove any weeds, rocks, or debris from the planting site to give your bee balm seeds the best chance to flourish. Consider adding organic matter such as compost or aged manure to enrich the soil and provide essential nutrients for the growing plants. Mix the organic matter into the soil thoroughly to ensure an even distribution of nutrients.
It's important to check the soil pH as bee balm prefers a slightly acidic to neutral pH level between 6.0 and 7.5. You can adjust the pH by adding lime to raise it or sulfur to lower it, following the instructions on the product packaging. Once the soil is prepared, water it lightly to moisten it before sowing the bee balm seeds. Following these steps will create an ideal environment for your bee balm seeds to germinate and thrive.
Sowing Bee Balm Seeds Indoors
Are you prepared to start planting your bee balm seeds indoors for optimal growth? Cultivating bee balm from seeds indoors can be a fulfilling experience that allows you to have robust, vigorous plants ready for transplant once the weather warms up. To start, gather your supplies: seedling trays, a quality potting mix, a spray bottle for watering, and of course, your bee balm seeds.
Fill your seedling trays with a dampened potting mix, making sure it's not too densely packed. Gently press the bee balm seeds into the soil, then lightly cover them with more potting mix. Spritz the surface with water from the spray bottle to keep the seeds moist. Position the trays in a warm location, as bee balm seeds need warmth to germinate successfully.
As your seeds sprout and grow, make sure they receive plenty of indirect sunlight. Rotate the trays regularly to encourage uniform growth. Keep the soil consistently moist but not waterlogged. Once your bee balm seedlings have developed a few sets of leaves, they can be transplanted into individual pots to continue growing indoors until they're ready to be moved outside.
Direct Sowing in the Garden
Consider preparing your garden bed for direct sowing of bee balm seeds by making sure the soil is well-drained and free of weeds. Before planting, loosen the soil to a depth of about 6-8 inches using a garden fork or tiller. Bee balm thrives in well-drained soil, so if your garden bed tends to retain water, consider adding compost to improve drainage.
Once the soil is prepared, scatter the bee balm seeds over the area and lightly press them into the soil. Avoid burying the seeds too deep; a light covering of soil or compost should suffice. Keep in mind that bee balm seeds require sunlight to germinate, so make sure they aren't buried too deeply.
After planting, gently water the area to moisten the soil. Avoid overwatering, as this can lead to rotting of the seeds. Throughout the germination period, keep the soil consistently moist but not waterlogged.
As the bee balm seeds start to grow, thin out the seedlings to ensure proper spacing. This will allow the plants to receive adequate sunlight and airflow, promoting healthy growth. Once established, bee balm is relatively low maintenance, requiring little more than occasional watering and deadheading to encourage continuous blooming.
Watering and Sunlight Requirements
How much sunlight do bee balm seeds require for germination and growth?
Bee balm seeds thrive in full sun to partial shade, needing at least 6-8 hours of sunlight daily. When planting your bee balm seeds, choose a location that receives ample sunlight to guarantee healthy growth. Sunlight is vital for the germination process and the overall development of bee balm plants.
In terms of watering, bee balm seeds need consistent moisture to germinate and establish themselves. Make sure that the soil is kept slightly moist but not waterlogged. Water your bee balm seeds regularly, especially during dry spells or hot weather. It's important to water the seeds gently to avoid disturbing them or causing water runoff.
When providing sunlight for your bee balm seeds, consider the needs of the specific variety you're growing. Some bee balm varieties may tolerate more shade than others, so it's crucial to research the requirements of your chosen type. By understanding the sunlight needs of your bee balm seeds and providing adequate watering, you can create an ideal environment for their germination and growth.
Fertilizing Bee Balm Plants
To promote healthy growth and vibrant blooms, fertilize your bee balm plants in the early spring before new growth emerges. Choose a balanced, slow-release fertilizer with equal parts nitrogen, phosphorus, and potassium to provide essential nutrients for your plants. You can find suitable fertilizers at your local garden center or nursery.
When applying fertilizer to your bee balm plants, follow the instructions on the product packaging carefully. It's important not to over-fertilize, as this can lead to excessive foliage growth at the expense of flower production. A general guideline is to use about a tablespoon of fertilizer per plant, sprinkling it evenly around the base of the plant and then gently working it into the soil.
After fertilizing your bee balm plants, water them thoroughly to help the nutrients penetrate the soil and reach the plant's roots. Throughout the growing season, you can supplement with a water-soluble fertilizer every 4-6 weeks to support continuous blooming and overall plant health.
Managing Pests and Diseases
When dealing with pests and diseases on your bee balm plants, regularly inspecting your plants for any signs of infestation or illness is essential. Keeping a close eye on your bee balm will help you catch any issues early on, allowing you to take action promptly. Common pests that may affect your bee balm include spider mites, aphids, and powdery mildew. To combat spider mites and aphids, you can use insecticidal soap or neem oil, applying it according to the product instructions. Powdery mildew, a fungal disease, can be prevented by ensuring good air circulation around your plants and avoiding overhead watering.
Another way to prevent pests and diseases is by maintaining good plant hygiene. Remove any dead or damaged foliage promptly, as these can attract pests and harbor diseases. Water your bee balm plants at the base to keep the foliage dry, which helps prevent fungal diseases. Additionally, spacing your plants adequately can also aid in preventing the spread of diseases.
Pruning and Deadheading Tips
Regularly pruning and deadheading your bee balm plants is key to maintaining their health and promoting continuous blooming. Pruning involves cutting back stems to control the plant's size and shape, while deadheading refers to the removal of faded flowers. Both practices help redirect the plant's energy towards new growth and blooming, ensuring a vibrant and healthy bee balm display in your garden.
To prune your bee balm, use clean and sharp gardening shears to trim back the stems in late spring or early summer. Look for any dead, damaged, or overcrowded stems to remove. Cutting the stems just above a set of healthy leaves or a bud encourages new growth. Regular pruning also helps improve air circulation around the plant, reducing the risk of diseases.
Deadheading bee balm is a simple task that can be done throughout the blooming season. As soon as a flower starts to fade, snip it off where it meets the stem. This prevents the plant from putting energy into seed production and encourages it to produce more flowers instead. Be sure to deadhead regularly to prolong the blooming period and keep your bee balm looking fresh.
Harvesting Bee Balm Seeds
Consider harvesting bee balm seeds once the flower heads have dried on the plant. When the vibrant blooms have faded and the seed heads start to turn brown, it's time to gather the seeds for future plantings. Begin by selecting a dry and sunny day to make sure the seeds are fully ripe.
To harvest the bee balm seeds, gently snip off the dried flower heads using sharp scissors or pruning shears. Place the cuttings in a paper bag or a container with good ventilation to allow for further drying. Shake the container gently to release the seeds from the dried flower heads.
Once you have collected the seeds, store them in a cool, dry place away from direct sunlight. Make certain the seeds are completely dry before storing to prevent mold or rot. Label the container with the seed variety and the date of harvest for easy identification later on.
Harvesting bee balm seeds not only allows you to propagate more plants but also gives you the opportunity to share these beautiful flowers with friends and family. By following these simple steps, you can collect bee balm seeds and continue to enjoy their colorful blooms in your garden season after season.
Storing Bee Balm Seeds for Future Use
To preserve the viability of bee balm seeds for future planting, proper storage is essential. After harvesting the seeds, make sure they're completely dry before storing them. Moisture can cause the seeds to mold or rot, rendering them unusable. Place the seeds in a paper envelope or a breathable container like a mesh bag to prevent any residual moisture from causing damage. Remember to label the container with the seed variety and date of collection for easy identification later on.
Find a cool, dry, and dark place to store your bee balm seeds. A critical temperature is important to prevent the seeds from deteriorating. A basement or a pantry shelf can be ideal storage spots. Avoid areas that are subject to temperature fluctuations, such as near windows or heating vents. Keeping the seeds away from direct sunlight is also important, as UV rays can decrease their viability over time.
Regularly check on your stored bee balm seeds to make sure they remain in good condition. Every few months, inspect the seeds for any signs of mold or pests. If you notice any issues, discard those seeds to prevent them from affecting the rest of your collection. By following these storage guidelines, you can maintain the quality of your bee balm seeds for future planting and enjoy a vibrant garden year after year.
Frequently Asked Questions
How Long Does It Typically Take for Bee Balm Seeds to Germinate?
Typically, bee balm seeds can take around 14 to 21 days to germinate. Make sure to keep the soil consistently moist but not waterlogged to help the seeds sprout successfully.
Can Bee Balm Seeds Be Saved and Stored for Multiple Planting Seasons?
Yes, you can save bee balm seeds for multiple planting seasons. Store them in a cool, dry place in an airtight container. Remember to label them with the date harvested for best results. Enjoy planting your bee balm!
Are There Any Specific Soil Ph Requirements for Successfully Growing Bee Balm From Seeds?
To achieve successful growth of bee balm from seeds, make sure your soil pH falls within the range of 6.0 to 7.0. This acidity level offers the perfect conditions for your bee balm plants to flourish and bloom beautifully.
What Is the Best Method for Protecting Bee Balm Seedlings From Pests and Animals in the Garden?
To protect bee balm seedlings from pests and animals in your garden, consider using barriers like chicken wire or row covers. Regularly inspect plants for signs of damage and apply organic pest control measures as needed.
Can Bee Balm Seeds Be Successfully Grown in Containers or Pots, and if So, Are There Any Special Considerations to Keep in Mind?
To successfully grow bee balm seeds in containers or pots, guarantee proper drainage, use quality soil, and provide adequate sunlight. Regularly water and fertilize, and be mindful of container size to prevent overcrowding. Enjoy watching your bee balm thrive!
Conclusion
To sum up, growing bee balm seeds can be a fulfilling experience with proper care and attention. By choosing the right seeds, preparing the planting site, and following the sowing and maintenance tips provided, you can enjoy stunning bee balm blooms in your garden.
Remember to water and provide sufficient sunlight, monitor for pests and diseases, and harvest and store seeds for future use. By following these steps, you can successfully cultivate bee balm from seeds and enhance the beauty of your garden.

