To grow celosia seeds successfully, start by selecting the right varieties that match your environment's sunlight exposure, temperature ranges, and soil type, such as Celosia argentea or Celosia spicata. Prepare a sunny spot with well-draining soil, spacing plants adequately to prevent overcrowding. Sow seeds indoors in containers with drainage holes, ensuring a mini greenhouse effect for germination, before transplanting seedlings outdoors after the last frost. Provide full sunlight for the plants, water consistently at the base, and use balanced fertilizers for vibrant growth.
Keep an eye out for pests and diseases, deadhead faded flowers for continuous blooms, and harvest seed pods for storage. Mastering these steps lays the foundation for successful celosia growth.
Key Takeaways
- Select suitable Celosia seed varieties based on sunlight, temperature, and soil conditions.
- Prepare a sunny, well-drained planting site with proper spacing and amended soil.
- Start seeds indoors in quality mix, transplant after last frost, and protect from cold.
- Ensure full sunlight exposure, avoid shading, and rotate for uniform light.
- Water consistently, fertilize with balanced mix, manage pests, deadhead for continuous blooms.
Selecting Celosia Seed Varieties
When selecting celosia seed varieties, consider choosing those that thrive in your climate and soil conditions. Different types of celosia seeds flourish in various environments, so it's important to pick the right one for your specific location. Take into account factors like sunlight exposure, temperature ranges, and soil composition when making your selection. By choosing celosia seeds that are well-suited to your area, you increase the chances of successful growth and vibrant blooms.
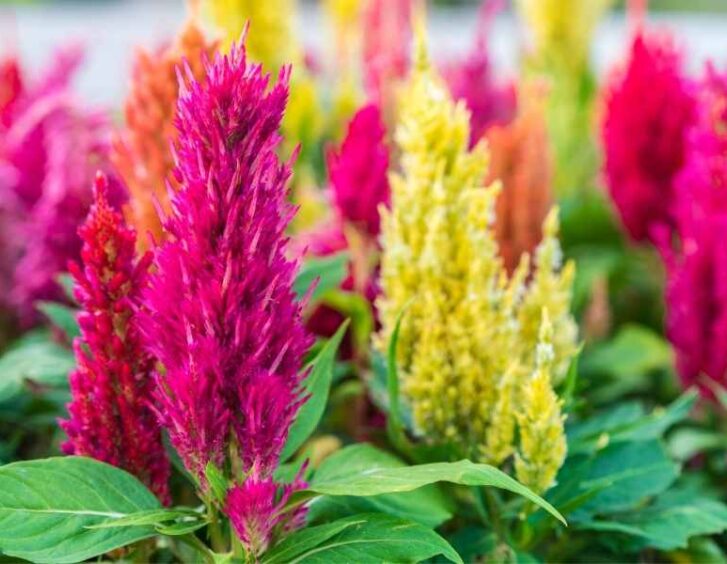
Varieties such as Celosia argentea or Celosia spicata are popular choices that can thrive in a wide range of conditions. These seeds are relatively easy to grow and maintain, making them ideal for beginners or those looking for low-maintenance options. If you live in a region with hot summers and well-draining soil, Celosia argentea may be the perfect choice for your garden. On the other hand, Celosia spicata is known for its unique spiky flowers and can tolerate a bit more shade, making it versatile for different gardening setups.
Preparing the Planting Site
Choose a sunny spot with well-draining soil for planting your celosia seeds. Celosia plants thrive in full sunlight, so make sure the chosen spot receives at least 6-8 hours of direct sunlight each day. Good drainage is essential to prevent waterlogging, which can cause root rot. Before planting, loosen the soil to a depth of about 6-8 inches to allow the roots to spread easily.
When preparing the planting site, consider the mature size of celosia plants. These vibrant flowers can grow to heights of 1 to 3 feet, so ensure there's enough space between plants for proper growth. Adequate air circulation helps prevent diseases and promotes healthy plant development.
It's also beneficial to amend the soil with organic matter like compost or well-rotted manure before planting. This enriches the soil, providing essential nutrients for the celosia plants to thrive. Mix the organic matter into the soil thoroughly to ensure even distribution.
Avoid areas with strong winds, as celosia plants have delicate flower heads that can be damaged easily. Additionally, choose a location away from tall trees or shrubs that might shade the plants and hinder their growth. By selecting a suitable spot and preparing the planting site thoughtfully, you set the stage for successful celosia cultivation.
Sowing Celosia Seeds Indoors
To successfully sow celosia seeds indoors, make sure you have a suitable container with drainage holes and a quality seed-starting mix. Choose a container that's at least 2-3 inches deep to allow for root growth and has holes in the bottom for proper drainage. The seed-starting mix should be light, well-draining, and sterile to prevent diseases. Fill the container with the mix, leaving a little space at the top for watering.
Next, sow the celosia seeds evenly on the surface of the soil. Press them lightly into the mix, but don't bury them too deep as they need light to germinate. Mist the seeds gently with water to moisten the soil without disturbing them. Cover the container with plastic wrap to create a mini greenhouse effect, helping to retain moisture and warmth for germination.
Place the container in a warm spot with indirect sunlight. Check the moisture level regularly and mist the soil when it feels dry. Once the seeds sprout, remove the plastic wrap and continue to water gently as needed. When the seedlings have a few sets of true leaves, they'll be ready for transplanting outdoors.
Sowing celosia seeds indoors provides a controlled environment for germination, giving your plants a head start before moving them outside. With proper care and attention, your celosia seedlings will thrive and bring vibrant color to your garden.
Transplanting Seedlings Outdoors
Consider the weather conditions and select a suitable location in your garden for transplanting your celosia seedlings outdoors. Wait until the last frost has passed before moving your seedlings outside. Choose an area that receives ample sunlight and has well-draining soil. Make sure there's enough space between plants for proper air circulation.
Prepare the garden bed by loosening the soil and adding compost for nutrients. Dig holes slightly larger than the root ball of each seedling. Gently remove the seedlings from their containers, being careful not to damage the roots. Place them in the prepared holes and backfill with soil, pressing gently to secure them in place. Water the seedlings thoroughly after transplanting to help them adjust to their new environment.
Keep an eye on the weather forecast and protect your seedlings if temperatures are expected to drop significantly. You can use row covers or cloches to shield the young plants from cold snaps. Gradually expose the seedlings to outdoor conditions by increasing their time outside each day. This process, known as hardening off, helps prevent shock from the shift.
Providing Adequate Sunlight
When transplanting your celosia seedlings outdoors, making sure they receive sufficient sunlight is vital for their growth and development. Celosia plants thrive in full sunlight, so it's important to choose a spot in your garden that gets at least 6-8 hours of direct sunlight each day. Placing them in a sunny location will help your celosia seedlings photosynthesize efficiently, promoting strong stem and leaf development.
To provide ample sunlight, consider the orientation of your garden beds. Placing your celosia plants in an east-facing area ensures they receive the gentle morning sun, which is beneficial for their growth. Additionally, avoid overcrowding your plants to prevent shading, as this can hinder their access to sunlight. Proper spacing between seedlings allows each plant to absorb the sunlight it needs to flourish.
If you notice your celosia seedlings leaning towards one side, it could be a sign that they aren't receiving uniform sunlight. In this case, rotate the pots or beds regularly to ensure all sides receive equal light exposure. By taking these simple steps to provide adequate sunlight, you set your celosia seedlings up for success, encouraging healthy growth and vibrant blooms.
Watering Celosia Plants Correctly
For best growth and health of your celosia plants, make sure you water them correctly. Water your celosia plants consistently to keep the soil moist but not waterlogged. Check the soil regularly by inserting your finger about an inch deep; if it feels dry, it's time to water.
When watering your celosia plants, aim to water at the base of the plant rather than overhead. This helps prevent water from sitting on the leaves, which can lead to diseases. Use a watering can or a gentle stream from a hose to water the plants directly at the soil level.
During hot and dry periods, you may need to water your celosia plants more frequently. These plants prefer slightly moist soil, so don't let the soil dry out completely between waterings. However, be cautious not to overwater, as this can cause root rot.
Consider using mulch around your celosia plants to help retain moisture in the soil. Mulch also helps regulate soil temperature and prevents weeds from growing around your plants. Organic mulches like straw or wood chips work well for celosia plants.
Fertilizing for Healthy Growth
For promoting healthy growth of your celosia plants, proper fertilization is crucial. Fertilizing your celosia plants provides them with the nutrients they need to thrive and produce vibrant blooms. When selecting a fertilizer for your celosia, opt for a balanced, water-soluble fertilizer with equal parts nitrogen, phosphorus, and potassium. This balanced mix will support overall plant health and encourage robust growth.
To fertilize your celosia plants, dilute the balanced fertilizer in water according to the package instructions. Apply the fertilizer solution to the base of the plants, taking care not to splash it on the leaves to avoid burning them. Fertilize your celosia plants once every two weeks during the growing season to guarantee they have a continuous supply of nutrients for ideal growth.
In addition, consider using a slow-release fertilizer to provide a steady nutrient release over time. This can be particularly beneficial for celosia plants grown in containers, as it reduces the need for frequent fertilization. Remember to follow the instructions on the fertilizer package and avoid over-fertilizing, as this can lead to nutrient imbalances and potentially harm your plants.
Managing Pests and Diseases
To effectively manage pests and diseases affecting your celosia plants, regularly inspecting them for any signs of infestation or illness is crucial. Keep an eye out for common pests like aphids, spider mites, and caterpillars, which can damage the leaves and flowers. If you notice any pests, gently spray your plants with a mixture of water and insecticidal soap to help eliminate them. Additionally, diseases like powdery mildew or leaf spot can impact celosia, so make sure your plants have good air circulation and avoid overhead watering to prevent these issues.
Another way to prevent pests and diseases is by maintaining good plant hygiene. Remove any dead or decaying plant material from around your celosia plants, as these can attract pests and harbor diseases. Regularly clean your gardening tools to avoid spreading any infections between plants.
If you do encounter a more serious pest infestation or disease outbreak, there are organic and chemical treatments available to help combat the issue. Neem oil or other botanical insecticides can be effective against pests, while fungicides may help with certain plant diseases. Always follow the instructions on the product label and consider starting with the least toxic options.
Deadheading for Continuous Blooms
To maintain a consistent display of vibrant blooms on your celosia plants, regularly remove faded flowers in a process known as deadheading. Deadheading is a simple but important task that involves plucking off the old, withered blooms from your celosia plants. By doing this regularly, you encourage the plant to focus its energy on producing new flowers rather than setting seeds, leading to a continuous cycle of colorful blooms in your garden.
When deadheading your celosia plants, look for flowers that have started to fade or wilt. Gently pinch or snip these spent blooms off just above a set of healthy leaves or a bud. This method not only keeps your plants looking neat and tidy but also stimulates them to produce more flowers, extending the blooming period throughout the growing season.
Regular deadheading also helps prevent your celosia plants from self-seeding, which can sometimes lead to unwanted seedlings popping up in your garden. By removing the faded flowers before they develop seeds, you can maintain better control over where your celosia plants grow and ensure a more organized and visually appealing garden space.
Harvesting Celosia Seed Pods
Harvesting celosia seed pods involves carefully inspecting the plants for mature pods ready for collection. When the vibrant blooms start to fade and dry up, it's a sign that the seed pods are forming. Look for pods that have turned brown and feel dry to the touch. To harvest the seed pods, gently pinch or cut them from the plant, making sure to leave some stem attached for easier handling.
Once you have collected the seed pods, place them in a paper bag or envelope to continue drying. Make sure to label the container with the plant's name and the date of collection. Allow the seed pods to dry completely in a warm, well-ventilated area for about two weeks.
After the seed pods have dried, carefully open them to reveal the tiny, dark seeds inside. Separate the seeds from the chaff and debris by gently rubbing them between your fingers or using a sieve. Store the seeds in a cool, dry place in a labeled envelope or container until you're ready to plant them in the next growing season.
Frequently Asked Questions
Can Celosia Plants Tolerate Frost or Cold Temperatures?
Celosia plants cannot tolerate frost or cold temperatures. To safeguard their well-being, protect them from chilly conditions. Remember, these vibrant plants thrive in warmth and sunlight, so offer them a cozy environment to flourish.
How Long Does It Typically Take for Celosia Seeds to Germinate?
Typically, celosia seeds take about 7 to 14 days to germinate. Make sure they have warmth, moisture, and light for successful sprouting. You'll soon see tiny green shoots poking through the soil!
Do Celosia Plants Attract Any Specific Pests or Diseases That I Should Watch Out For?
To protect your celosia plants, keep an eye out for common pests like aphids and spider mites. Regularly inspect them for signs of diseases such as powdery mildew or fungal infections. Proper care and early detection are key.
Is It Necessary to Prune or Trim Celosia Plants for Optimal Growth?
To guarantee ideal growth, yes, pruning and trimming celosia plants can be advantageous. By eliminating dead or damaged parts, you encourage new growth and uphold plant health. It's a straightforward task that can result in vibrant blooms.
Can Celosia Plants Be Grown in Containers or Pots?
Yes, you can absolutely grow celosia plants in containers or pots. They thrive in well-draining soil and need adequate sunlight. Remember to water regularly and provide proper care to enjoy their vibrant blooms in a confined space.
Conclusion
To grow celosia seeds successfully, it is important to follow several key steps:
- Choose the right variety
- Prepare the planting site
- Sow seeds indoors
- Transplant seedlings outdoors
- Provide ample sunlight
- Fertilize for healthy growth
- Manage pests and diseases
- Deadhead for continuous blooms
- Harvest seed pods for future planting
By carefully following these steps, you can enjoy vibrant celosia flowers in your garden. This will create a beautiful and colorful display that will brighten up your outdoor space.
Happy gardening!


