When planting poppy seeds, begin by selecting the right variety for your climate and soil conditions. Clear the planting area, loosen the soil, and add compost for best growth. Test the soil pH and nutrient levels, aiming for a pH of 6.0 to 7.0, and amend if necessary. Sprinkle the seeds evenly on the soil surface, lightly cover them, and keep the soil consistently moist. Thin out seedlings to avoid overcrowding and promote healthy growth. Fertilize with a balanced, low-nitrogen fertilizer every 4-6 weeks, watch for pests and diseases, and harvest the seeds when the pods are dry.
Following these steps will help you cultivate a thriving poppy garden, with more tips available as you explore further.
Key Takeaways
- Choose poppy seeds suited to your climate and soil.
- Clear, loosen, and amend soil for optimal growth.
- Sow seeds evenly, cover lightly, and keep moist.
- Thin out seedlings for healthy growth and quality.
- Fertilize with low nitrogen, manage pests, and diseases.
Choosing the Right Poppy Seeds
When selecting poppy seeds for planting, prioritize choosing varieties that are well-suited to your climate and soil conditions. Different types of poppies thrive in various environments, so it's crucial to pick ones that will flourish in your specific area. Consider factors like temperature, sunlight, and soil composition when deciding on the right seeds for your garden. By selecting seeds that match your local conditions, you increase the chances of your poppies growing healthily and blooming beautifully.
Research the different poppy varieties available and their requirements to make an informed decision. Some poppy species prefer full sun, while others can tolerate partial shade. Knowing the sunlight needs of the specific poppy seeds you choose will help you find the ideal planting spot in your garden. Additionally, consider the average temperature in your region throughout the year. Certain poppy varieties are more cold-hardy, while others thrive in warmer climates.
Consult with local gardening experts or nurseries to gather information about which poppy seeds are popular and successful in your area. Connecting with other gardeners who've experience growing poppies can provide valuable insights and tips for selecting the right seeds. By choosing poppy varieties that are well-adapted to your local climate and soil, you set yourself up for a successful and rewarding gardening experience.
Preparing the Planting Site
To prepare the planting site for your poppy seeds, clear the area of any debris and weeds to create a clean and fertile bed for optimal growth. Start by removing rocks, sticks, and any other items that may obstruct the growth of your poppies. Weeds can compete with your poppy seeds for nutrients, sunlight, and water, so make sure the area is free from them. This step is essential to provide your poppy seeds with the best possible environment to thrive.
After clearing the site, loosen the soil using a garden fork or a tiller. This will help the roots of your poppy seeds to penetrate the soil easily and allow for better water absorption. Aim for a depth of about 12 inches to ensure that the roots can establish themselves firmly in the ground.
Consider adding organic matter such as compost or aged manure to the soil. This will enrich the soil, providing essential nutrients for your poppy seeds as they grow. Mix the organic matter thoroughly with the soil to guarantee an even distribution of nutrients throughout the planting site.
Testing and Amending Soil
Check your soil's pH level and nutrient content before planting your poppy seeds to ensure ideal growing conditions. Testing the soil is essential for the success of your poppies. You want a pH level between 6.0 and 7.0 for these vibrant flowers to thrive. A simple soil testing kit from your local garden center can provide you with this necessary information.
Once you know your soil's pH level, you may need to amend it to create the perfect environment for your poppies. If the pH is too high or too low, you can adjust it by adding amendments like lime to raise the pH or sulfur to lower it. Ensuring the right pH level will help your poppies absorb nutrients efficiently.
Apart from pH, your soil's nutrient content is also important. Nutrient-rich soil will promote healthy growth and beautiful blooms. Consider adding organic matter like compost or well-rotted manure to enhance the soil's fertility. These amendments will provide essential nutrients and improve soil structure, creating a welcoming home for your poppy seeds.
Sowing Poppy Seeds
To effectively sow poppy seeds, prepare the soil by loosening it with a rake and removing any debris or weeds. This step is essential for creating a welcoming environment for your poppy seeds to germinate and grow into beautiful flowers. Once the soil is prepped, sprinkle the poppy seeds evenly over the soil surface. You can lightly press them into the soil using your hands or a gentle pat with the back of the rake.
After sowing the seeds, it's important to cover them lightly with a thin layer of soil. This helps protect the seeds and keeps them in place. Avoid burying the seeds too deep, as they need light to germinate. Water the area gently to settle the seeds in place without disturbing them.
Remember to keep the soil consistently moist but not waterlogged. Poppy seeds need the right balance of moisture to sprout successfully. As you care for your poppy seeds, make sure to monitor the soil moisture regularly.
It's a good idea to mark the area where you've sown the poppy seeds to avoid accidental disturbance. This way, you can keep track of their progress and guarantee they've the best chance of thriving. With proper care and attention, you'll soon see your poppy seeds sprout and grow into vibrant blooms, adding a lovely touch to your garden.
Watering Seedlings
Ensure that your seedlings receive adequate water to support their growth and development. Watering your poppy seedlings is essential for their well-being. When it comes to watering, consistency is vital. Make sure to water your seedlings regularly, keeping the soil moist but not waterlogged. A good rule of thumb is to water them when the top inch of soil feels dry to the touch.
To water your seedlings, use a gentle stream of water to avoid disturbing the delicate roots. A watering can with a narrow spout works well for this purpose. Guarantee that the water reaches the root zone without creating pools on the surface. Aim to water the base of the plant directly, allowing the roots to absorb the moisture effectively.
Remember that overwatering can be just as harmful as underwatering. Excess water can lead to root rot and other issues, so be mindful not to drown your seedlings. If you notice water pooling on the surface after watering, allow it to drain away to prevent waterlogging.
Providing Adequate Sunlight
For optimal growth, make sure your poppy seedlings receive plenty of sunlight throughout the day. Sunlight is vital for the healthy development of your plants. Place your poppy seedlings in an area where they can bask in full sunlight for at least 6 to 8 hours each day. This will help them thrive and produce beautiful blooms.
When selecting a spot for your poppy seedlings, search for a location that receives ample sunlight and has well-draining soil. Avoid placing them in shaded areas or spots that are prone to waterlogging. Remember, poppies love the sun, so providing them with sufficient sunlight is essential for their growth and overall well-being.
If you're growing poppies indoors, place them near a sunny window where they can soak up the sunlight. You may need to rotate the pots occasionally to make sure all sides of the seedlings receive equal amounts of sunlight. Consider using artificial grow lights if natural light is limited in your indoor space.
Thinning Out Seedlings
Consider removing excess seedlings to guarantee proper spacing and ideal growth for your poppy plants. Thinning out seedlings is an important step in the early stages of poppy plant care. When your poppy seeds have sprouted, you may find that there are more seedlings in one spot than necessary for healthy growth. By thinning out these extra seedlings, you allow the remaining plants to have ample space, sunlight, and nutrients to thrive.
To thin out your poppy seedlings, gently grasp the excess ones and carefully pull them out of the soil. This should be done when the seedlings are still small to avoid damaging the roots of the remaining plants. Aim to leave about 6-8 inches of space between each seedling to make sure they've enough room to spread out as they grow.
Thinning out seedlings not only helps individual plants to develop better but also prevents overcrowding, which can lead to competition for resources and poor growth overall. It may feel difficult to remove some of the seedlings, but trust that this process will benefit the entire crop in the long run. Remember, healthy spacing promotes healthier plants and a more vibrant garden.
Fertilizing Poppy Plants
Thinning out seedlings has set the stage for the next important step in caring for your poppy plants: fertilizing them. Fertilizing your poppy plants is essential for their healthy growth and vibrant blooms. When it comes to choosing the right fertilizer for your poppies, opt for a balanced, all-purpose fertilizer that's low in nitrogen. High levels of nitrogen can lead to excessive foliage growth at the expense of flower production, so a balanced fertilizer with equal parts of nitrogen, phosphorus, and potassium is ideal.
During the growing season, which is typically spring and early summer for poppies, fertilize your plants once every 4-6 weeks. You can either use a water-soluble fertilizer that can be diluted and applied while watering or a granular fertilizer that can be spread around the base of the plants. Always follow the instructions on the fertilizer packaging to make sure you're applying the correct amount.
When fertilizing your poppies, be careful not to over-fertilize, as this can lead to nutrient imbalances and potentially harm your plants. It's better to slightly under-fertilize than to overdo it. Remember, healthy soil with good drainage and proper sunlight are also vital for the overall well-being of your poppy plants.
Managing Pests and Diseases
After fertilizing your poppy plants, it's essential to be vigilant in managing pests and diseases to safeguard their continued health and well-being. Poppies can be vulnerable to pests like aphids, slugs, and spider mites, as well as diseases such as powdery mildew and root rot. To protect your poppies, regularly inspect both the leaves and stems for any signs of infestation or disease. If you notice anything unusual, take action promptly to prevent further damage.
One effective way to manage pests on your poppy plants is by using natural remedies like neem oil or insecticidal soap. These solutions are gentle on the environment while effectively controlling common pests. Additionally, maintaining good airflow around your poppies by avoiding overcrowding can help prevent diseases like powdery mildew, which thrives in humid conditions.
When it comes to diseases, prevention is essential. Ensure your poppies are planted in well-draining soil to prevent waterlogged conditions that can lead to root rot. Water your plants at the base to keep the foliage dry, as wet leaves can attract diseases. If you do encounter a disease issue, promptly remove any infected plant parts and dispose of them properly to prevent the spread.
Harvesting Poppy Seeds
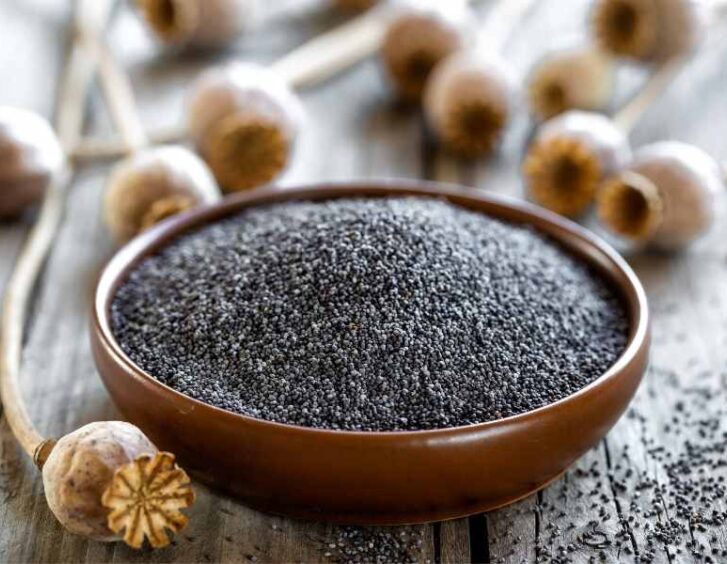
To successfully harvest poppy seeds, carefully observe the seed pods for signs of maturity and readiness for collection. When the poppy seed pods turn a light brown color and begin to dry out, they're typically ready for harvesting. To collect the seeds, gently cut the pods from the plant using sharp scissors or pruning shears. Place the harvested pods in a paper bag or basket to guarantee good airflow and prevent mold formation during drying.
Next, allow the seed pods to dry in a warm, well-ventilated area for about 7-10 days. Check the pods regularly to make sure they're fully dry before proceeding to extract the seeds. Once the pods are dry, gently break them open over a clean surface to release the tiny poppy seeds. You can further separate the seeds from any remaining plant material by softly rubbing them between your fingers or using a sieve.
After extracting the seeds, store them in an airtight container in a cool, dark place until you're ready to use them. Properly stored poppy seeds can last for up to a year without losing their flavor or potency. Remember to label the container with the harvest date to keep track of freshness. Enjoy using your freshly harvested poppy seeds in various culinary creations!
Frequently Asked Questions
Can Poppy Seeds Be Planted in Containers or Raised Beds Instead of Directly in the Ground?
Yes, you can plant poppy seeds in containers or raised beds. It offers control over soil conditions and space. Remember to provide adequate drainage and sunlight. Enjoy the flexibility and convenience of planting poppies in containers or raised beds.
How Long Do Poppy Seeds Typically Take to Germinate After Planting?
Poppy seeds typically take around 10 to 14 days to germinate after planting. Keep the soil moist and provide adequate sunlight for successful growth. Remember, patience is key in gardening; soon you'll see those beautiful blooms!
Do Poppy Plants Require Any Special Care During the Winter Months?
During winter, poppy plants benefit from a layer of mulch to protect their roots from freezing temperatures. Guarantee they receive sufficient water and sunlight. Regularly check for pests or diseases. With proper care, your poppies will thrive.
Are There Any Companion Plants That Can Help Promote the Growth of Poppy Plants?
To promote poppy growth, consider companion plants like lavender, marigolds, or cornflowers. These allies attract beneficial insects and provide shade. Remember to plant them nearby for a garden community that fosters your poppies' health and vibrancy.
Can Poppy Seeds Be Harvested and Saved for Planting in Future Seasons?
Yes, you can harvest and save poppy seeds for planting in future seasons. Make sure the seeds are fully dry before storing them in a cool, dark place. This way, you'll be able to enjoy growing beautiful poppies year after year.
Conclusion
To sum up, planting poppy seeds can be a rewarding experience with the right preparation and care. By choosing the right seeds, preparing the planting site, testing and amending soil, sowing the seeds, watering seedlings, thinning out seedlings, fertilizing plants, managing pests and diseases, and harvesting the seeds, you can successfully grow beautiful poppies in your garden.
Follow these steps diligently for a successful poppy garden.

