To plant hollyhock seeds successfully, start by selecting varieties that suit your climate and soil, considering factors like temperature, sunlight, and plant height preferences. Prepare a well-suited planting site by clearing weeds, providing good spacing, and ensuring ample sunlight. Hollyhocks thrive in full sun and require well-draining, slightly acidic to neutral pH soil enriched with compost or manure. Start seeds indoors for controlled germination in a moistened seed-starting mix, then transplant them outdoors to a sunny spot with well-draining soil. Water deeply once a week, mulch to retain moisture, and fertilize sparingly with balanced fertilizer in early spring. Support tall stems with stakes or trellises, monitor for pests and diseases, deadhead spent blooms frequently, and save seeds for future planting success. Mastering these steps will set the stage for healthy hollyhocks in your garden.
Key Takeaways
- Select hollyhock varieties suitable for your climate and soil.
- Prepare a sunny site with well-draining, slightly acidic soil.
- Start seeds indoors, then transplant to a sunny spot outdoors.
- Water deeply weekly, mulch, and fertilize in early spring.
- Provide structural support with stakes or trellises for sturdy growth.
Selecting the Right Hollyhock Seeds
When selecting hollyhock seeds, look for varieties that are well-suited to your climate and soil conditions. It's crucial to choose seeds that will thrive in your specific environment, ensuring a successful and vibrant garden. Consider the average temperature, sunlight exposure, and soil type in your area to determine which hollyhock seeds are the best match for your garden. By opting for seeds that are suited to your conditions, you increase the likelihood of a flourishing hollyhock display that will beautify your outdoor space.
Seek out hollyhock seed varieties that resonate with your personal style and preferences. Whether you prefer classic single-colored blooms or vibrant mixed hues, there's a wide range of options to choose from. Pick seeds that speak to you aesthetically, as they'll bring you joy and a sense of belonging when they bloom in your garden. Additionally, consider the height of the hollyhocks, as some varieties can grow quite tall and may require staking for support.
Explore different hollyhock seed suppliers to find reputable sources that offer high-quality seeds. Reading reviews and seeking recommendations from fellow gardeners can help you identify reliable seed providers. Purchasing seeds from trusted sources increases the likelihood of successful germination and healthy plant growth. Remember, choosing the right hollyhock seeds is the initial step towards creating a beautiful and thriving garden that reflects your unique taste and style.
Preparing the Planting Site
To guarantee optimal growth for your selected hollyhock seeds, assess the planting site for factors like sunlight exposure and soil quality. Before sowing the seeds, examine the area where you intend to plant them. Hollyhocks thrive in full sun, so select a location that receives at least 6-8 hours of sunlight daily. Check for any obstacles that may obstruct the sunlight, such as tall trees or buildings. Confirm the soil is well-drained and rich in nutrients to support vigorous growth.
Clear the planting site of any weeds or debris that could impede the hollyhock seeds from sprouting and growing successfully. Providing adequate spacing between plants is crucial to allow for proper airflow and prevent overcrowding. This helps minimize the risk of diseases and enhances overall plant health.
Take into account the visual appeal of the planting site as well. Hollyhocks can grow quite tall, so planting them next to a fence or at the rear of a flower bed can create a stunning backdrop for your garden. Furthermore, situate them in a place where they can be easily admired to enhance your gardening experience and foster a sense of belonging in your outdoor space. By preparing the planting site thoughtfully, you establish the foundation for your hollyhock seeds to thrive and add beauty to your garden.
Understanding Soil and Sun Requirements
Assess the sunlight exposure and soil quality to guarantee the optimal growth of your hollyhock seeds. Hollyhocks thrive in full sun, so select a planting site that receives at least 6-8 hours of direct sunlight daily. Make sure the area is well-draining to prevent waterlogging, as hollyhocks prefer soil that's moist but not waterlogged. Sandy loam or loamy soil with a slightly acidic to neutral pH level of 6.0-7.0 is ideal for these vibrant flowers to flourish.
Before planting, test the soil quality by digging a hole about 12 inches deep and filling it with water. If the water drains within 4-6 hours, the soil is well-draining. If the water remains stagnant, consider adding organic matter like compost to improve drainage. Hollyhocks also benefit from fertile soil, so enrich the planting area with compost or well-rotted manure to provide essential nutrients for robust growth.
Regarding sunlight, hollyhocks are sun worshippers and will reward you with abundant blooms if given adequate sunshine. Make sure there are no obstructions like trees or buildings that might shade the plants. By understanding and meeting these soil and sun requirements, you set the stage for successful hollyhock growth and a beautiful addition to your garden that will make you feel like a true green thumb.
Sowing Hollyhock Seeds Indoors
After understanding the soil and sun requirements for best growth in outdoor conditions, consider sowing your hollyhock seeds indoors to kickstart the germination process effectively. By starting your hollyhock seeds indoors, you provide them with a controlled environment that promotes successful sprouting before transplanting them outdoors.
To begin, choose a well-draining container filled with a moistened seed-starting mix. Plant the hollyhock seeds about ¼ inch deep in the soil, gently patting the surface to guarantee good seed-to-soil contact. Place the container in a warm location that receives indirect sunlight.
Keep the soil consistently moist but not waterlogged by misting it regularly. Cover the container with plastic wrap to create a mini greenhouse effect that retains moisture. Check the seeds daily for any signs of germination, which can take around 14 to 21 days.
Once the seeds have sprouted, remove the plastic wrap and continue to provide them with bright, indirect light. As the seedlings grow, ensure they have good air circulation to prevent damping off.
Transplant the seedlings outdoors after the last frost date, making sure they have been hardened off to acclimate to the outdoor conditions. With this approach, you can jumpstart the growth of your hollyhocks and enjoy their beautiful blooms in your garden.
Transplanting Seedlings Outdoors
When transplanting your hollyhock seedlings outdoors, make sure they're properly hardened off to withstand the outdoor conditions. Important off is a vital step that helps your seedlings adjust from the sheltered indoor environment to the harsher outdoor climate. Begin by gradually exposing your seedlings to the outdoor environment for increasing periods over the course of a week or two. Start with a few hours of morning sunlight and then gradually increase the time and exposure to wind and direct sunlight. This process toughens up the plants and prepares them for life outdoors.
Choose a sunny spot in your garden with well-draining soil for transplanting your hollyhock seedlings. Make sure to space them about 2 feet apart to allow for proper air circulation and growth. Dig holes that are slightly larger than the root ball of each seedling and gently place them in the ground. Backfill the holes with soil and pat it down gently to secure the seedlings in place.
Water your newly transplanted seedlings generously to help them settle into their new environment. Keep the soil consistently moist but not waterlogged. Mulch around the base of the plants to retain moisture and suppress weeds. Regularly check on your seedlings to make sure they're thriving in their new outdoor home.
Watering and Fertilizing Hollyhocks
To guarantee healthy growth, regularly water and fertilize your hollyhocks throughout the growing season. Water your hollyhocks deeply once a week, ensuring the soil is moist but not waterlogged. During hot spells, increase watering to twice a week. Aim to water the base of the plant to prevent fungal diseases. Mulching around the base can help retain moisture and reduce the frequency of watering.
When it comes to fertilizing your hollyhocks, use a balanced fertilizer in early spring as new growth begins. Choose a fertilizer with equal parts nitrogen, phosphorus, and potassium to promote overall plant health. You can also opt for a slow-release fertilizer to provide nutrients gradually over time. Avoid over-fertilizing, as this can lead to excessive foliage growth with fewer flowers.
As your hollyhocks continue to grow, consider giving them a boost with a light application of fertilizer every 4-6 weeks during the growing season. Be sure to follow the instructions on the fertilizer packaging to avoid damaging the plants. Regular feeding will help your hollyhocks produce vibrant blooms and sturdy stems.
Providing Support for Tall Stems
Consider installing stakes or trellises to provide sturdy support for the tall stems of your hollyhocks as they grow. Hollyhocks can reach impressive heights, and these supports will guarantee they don't bend or break under their weight. Staking your hollyhocks early in their growth will secure they've the necessary reinforcement to stand tall and proud in your garden.
When choosing stakes or trellises, opt for materials that are durable and can withstand the weight and height of mature hollyhocks. Place the stakes or trellises close to the base of the plant and gently tie the stems to them using soft garden twine. Be careful not to fasten the twine too tightly to allow room for growth while still providing support.
As your hollyhocks continue to grow, check the ties regularly to ensure they aren't becoming too tight or cutting into the plant. Adjust the ties as needed to accommodate the increasing girth of the stems. Additionally, inspect the stakes or trellises for stability, making sure they're firmly anchored in the ground to withstand winds and the weight of the plant.
Monitoring for Pests and Diseases
Keeping a close eye on your hollyhock plants is essential to promptly identify and address any potential pest or disease issues. Pests like aphids, spider mites, and Japanese beetles can cause damage to your plants, while diseases such as powdery mildew and rust can affect their health. Regularly inspecting your hollyhocks can help you catch these problems early on.
When monitoring for pests, check the undersides of leaves and along the stems for any signs of bugs or eggs. If you notice holes in the leaves or sticky residue, it may indicate the presence of pests. In such cases, you can gently spray the plants with water to dislodge the pests or use insecticidal soap as a natural remedy.
For diseases, keep an eye out for any unusual spots, discoloration, or mold on the leaves. If you suspect a disease, promptly remove the affected leaves to prevent it from spreading further. Make sure to sanitize your gardening tools after each use to avoid transferring any potential pathogens.
In addition to visual inspections, pay attention to any changes in your hollyhock plants' growth or overall appearance. Early detection and intervention are key to maintaining healthy plants and ensuring a vibrant garden. By staying vigilant and addressing pest and disease issues promptly, you can help your hollyhocks thrive and bloom beautifully.
Deadheading for Continued Blooms
Inspect your hollyhock plants regularly for spent blooms to promote continued flowering. Removing faded or dead flowers, known as deadheading, is crucial for extending the blooming period of your hollyhocks. By cutting off these spent blooms, you redirect the plant's energy from seed production back into creating new flowers. This practice not only maintains the neat appearance of your garden but also stimulates the plant to produce more blooms, providing you with a beautiful and lively display throughout the growing season.
To deadhead your hollyhocks, simply look for flowers that have withered or lost their color. Trace the stem down to where it meets a set of leaves and use clean gardening shears to make a precise cut right above this point. Remember to dispose of the removed blooms to prevent any diseases from spreading. Deadheading is a straightforward task that can be done regularly, ideally every few days, to guarantee your hollyhocks continue to bloom profusely.
Saving Seeds for Future Planting
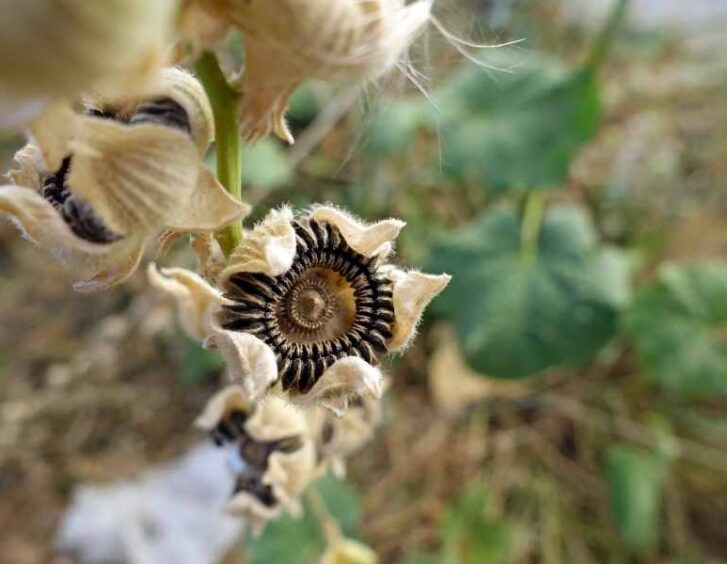
To preserve hollyhock seeds for future planting, wait until the seed pods have dried on the plant before harvesting them. When the pods turn brown and start to crack open, gently cut them from the stem using scissors or pruners. Place the pods in a paper bag and store them in a cool, dry place for about a week to guarantee they're fully dry before extracting the seeds.
Next, carefully open the dried seed pods and collect the small, round hollyhock seeds inside. Make sure to store the seeds in a cool, dark place in a paper envelope or breathable container to prevent any moisture build-up. Properly stored hollyhock seeds can remain viable for up to three years.
Label the envelope with the seed variety and the date harvested to keep track of the seeds. When it's time to plant them, choose a sunny location with well-draining soil. Sow the seeds in early spring or late summer, lightly covering them with soil and keeping them consistently moist until they germinate.
Frequently Asked Questions
How Long Does It Typically Take for Hollyhock Seeds to Germinate?
Typically, hollyhock seeds take around 14-21 days to germinate. Keep them moist and warm to aid in the process. Once they begin sprouting, transfer them to a sunny spot for further growth.
Can Hollyhocks Be Grown in Containers or Do They Need to Be Planted Directly in the Ground?
You can grow hollyhocks in containers, but they thrive when planted directly in the ground. Their deep taproots benefit from the space and stability of being in soil, allowing them to reach their full potential.
Are There Any Specific Companion Plants That Are Beneficial to Grow Alongside Hollyhocks?
When planting hollyhocks, consider companions like lavender, echinacea, or yarrow. These can attract pollinators, offer support, and enhance your garden's beauty. Choose plants that thrive in similar conditions to create a harmonious and vibrant landscape.
Do Hollyhocks Attract Any Specific Types of Pollinators or Wildlife?
Hollyhocks attract a variety of pollinators, from bees to butterflies, enhancing your garden's beauty and biodiversity. Their vibrant blooms are like a welcome sign to these winged visitors, adding life and color to your outdoor space.
Can Hollyhocks Be Grown in All Climate Zones, or Are There Specific Regions Where They Thrive Best?
In most climate zones, hollyhocks can thrive, but they do best in areas with full sun and well-draining soil. They bring beauty to your garden and attract pollinators, making them a lovely addition.
Conclusion
To sum up, planting hollyhock seeds demands meticulous preparation and maintenance to guarantee successful growth.
By choosing the appropriate seeds, offering suitable soil and sunlight conditions, and vigilantly checking for pests and diseases, you can relish in exquisite blooms for years to come.
Don't forget to preserve seeds for future planting and remove faded flowers for continuous blooming.
With these measures, you can cultivate a stunning hollyhock garden in your outdoor space.


 Lalmon LLC. All rights reserved